To make a slideshow video, pick your best photos and one song, put the photos in story order, show each one for about 3 to 5 seconds with the changes on the beat, add one title and export an MP4. The tool you choose decides how much of that you control. iPhone Photos and Google Photos set a slideshow to music in a few taps but choose the pacing for you. iMovie, Canva, CapCut and ChatCut let you set every photo’s length, the titles and the transitions.
This guide covers turning photos and clips you already have into a video. It starts with the planning that decides whether a slideshow feels good to watch, including a worked timing example, then gives the steps for six tools. Menu paths were checked against each vendor’s documentation on November 4, 2026.
How to make a slideshow video
- Choose the photos and the song together. The song’s length sets how many photos fit.
- Order them as a story. An opening that sets the scene, a middle with people and moments, your best shots last.
- Set the timing. Start at 3 to 5 seconds per photo and change pictures on the music’s bar lines.
- Fit each photo to the frame without cropping through faces.
- Add one title and few transitions. Hard cuts on the beat, a dissolve where the mood changes.
- Export an MP4 and watch the file on the screen it will be shown on.
Choose a slideshow route
- iPhone Photos: memory movie. Free and the fastest. Photos picks the pacing; you choose the photos, song, title and a short, medium or long length.
- iMovie on iPhone: movie project. Free. You set each photo’s duration, the Ken Burns movement, titles and music, then save a video file.
- Google Photos: highlight video. Free on Android and the web. Templates come with music, text and beat-matching; the included music is for personal, non-commercial use.
- Canva: video design in the browser. A timeline with text, audio and transitions. Free MP4 downloads up to 30 minutes at up to 1080p.
- CapCut: desktop editor. Precise timing and a large effects library. Items marked Pro, and 4K or 60 fps export, need a subscription.
- ChatCut: desktop app or web editor. A full timeline, plus an agent that can do the first assembly from a written brief. Local export up to 4K from the desktop app.
If your material is mostly video clips rather than photos, our guide to making a video from several clips covers the mismatches (frame rate, aspect ratio, audio) that matter more there.
Plan the photos, music and timing
The steps in any app take minutes. The decisions below are what make one slideshow easy to watch and another drag.
Pick and order the photos
Choose fewer photos than you think. Ten strong photos beat thirty near-duplicates, and every photo you add costs the viewer three to five seconds. Then sort them into three parts:
- Opening. Wide shots that say where and when: the venue, the beach, the front door. Put the title here.
- Middle. People, faces and the moments that happened. Short video clips belong here, trimmed to their best few seconds.
- Payoff. The group photo, the kiss, the view from the summit. End on your strongest image and hold it while the music finishes.
Within each part, chronological order is usually right. Break it when two photos look alike: put something different between them, or cut one.
Decide how long each photo stays
Three to five seconds per photo is a good starting point. Give busy group shots and photos with text more time, and simple details less. Slow, emotional music suits longer holds (5 to 8 seconds); upbeat music suits shorter ones. A video clip usually needs 5 to 8 seconds to show its moment.
That gives you a quick way to work out how many photos you need:
| Slideshow length | Photos at 4 s each | Photos at 6 s each |
|---|---|---|
| 1 minute | 15 | 10 |
| 3 minutes | 45 | 30 |
| 5 minutes | 75 | 50 |
| 20 minutes | 300 | 200 |
Subtract the time any video clips take before you count photos. Anything longer than one song needs a second song, so plan where the music changes, usually at a change of chapter in the story.
Time the changes to the music
Changing pictures on the beat is what makes a slideshow feel edited rather than automatic. You don’t need to count every beat. Count bars: in most pop songs a bar is four beats, and one bar lasts 240 ÷ BPM seconds. At 120 BPM that’s 2 seconds, so a photo every two bars lasts 4 seconds. If you don’t know the tempo, count the beats in 15 seconds of the song and multiply by four.
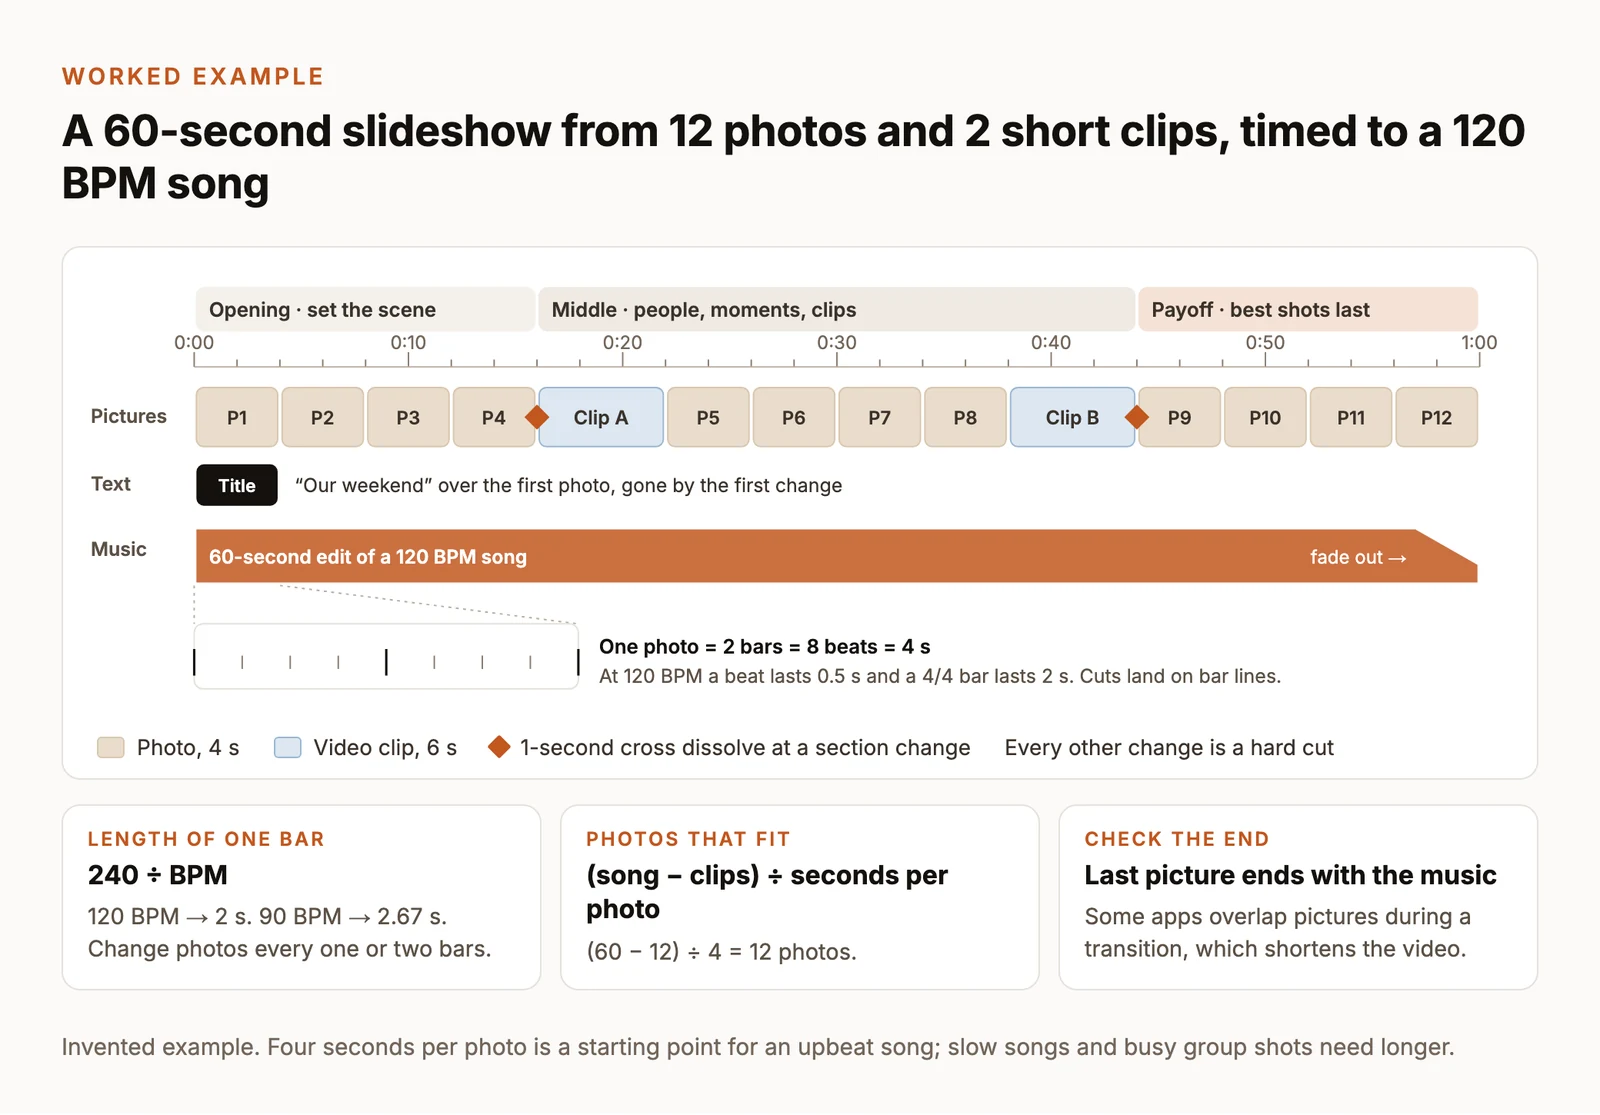
Two cautions. Some apps overlap the two pictures during a transition, which shortens the whole video by the transition’s length; after adding transitions, check that the last photo still ends with the music. And cut the song, not the story: if the song is longer than your photos, fade it out at the end of a phrase or trim a verse, rather than stretching every photo.
Fit every photo to the frame
Decide the shape first: 16:9 for a TV, YouTube or a projector, 9:16 for Reels, TikTok and Shorts. Then deal with the photos that don’t match. A portrait photo in a landscape frame is the most common problem, and apps handle it differently. Some crop it to fill the frame, often through people’s heads.
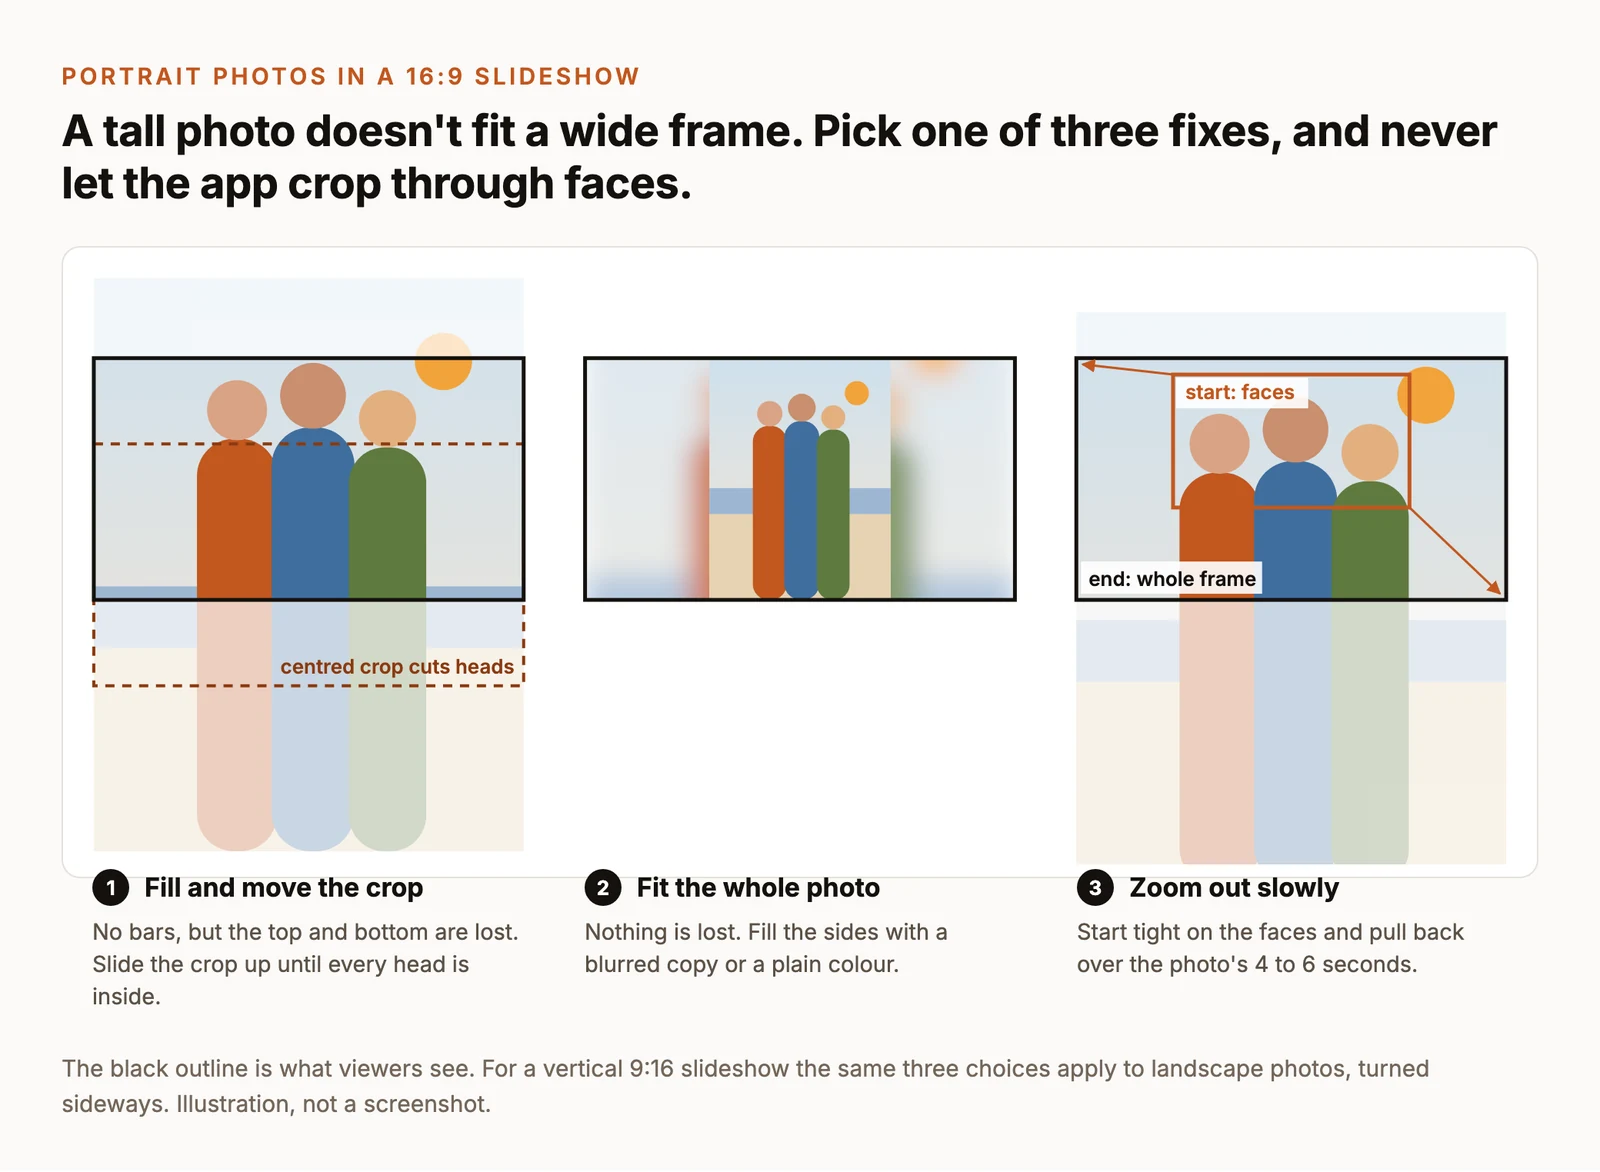
Check every portrait photo in the preview, not just the first. If your phone saves HEIC photos and an editor won’t import them, export them as JPEG first; JPEG and PNG work everywhere.
Use music you’re allowed to use
A slideshow for a family dinner and one posted on YouTube have different rules. Music bundled with an app often comes with limits: Google Photos says the music it provides is for personal, non-commercial use, and CapCut and Canva mark premium tracks that need a subscription or licence. A commercial song may be muted or claimed when you post it. Our guide to adding music to a video without copyright claims covers where to find tracks that are cleared for public posting.
Make a slideshow on iPhone
Fastest: a memory movie in Photos
On iOS 26, the Photos app has two features that sound alike. Play as Slideshow plays a selection full screen with music (tap Select, choose photos, tap the More button, then Play as Slideshow), but it only plays them. To get something you can share, use a memory movie (Apple):
- Make an album of the photos and videos you want.
- Open the album and tap the play button. Photos plays it as a memory movie set to music.
- Personalize it (Apple). Tap the screen while it plays to choose a Memory mix (song, pacing and look together), change the song, or set the length to Short, Medium or Long. Use Manage Photos to add or remove photos, and touch and hold a photo to drag it to a new position. Edit the title and subtitle from the memory’s menu.
- Share it. As it plays, tap the More button at the top, then Share (Apple).
Photos decides how long each photo stays, so you can’t time changes to the beat yourself. Music comes from Apple’s memory soundtracks and suggested songs; Apple Music subscribers can also pick from their Apple Music library. Play the shared video once on another device to check that the music came with it.
More control: iMovie
Apple’s free iMovie app gives you a timeline on the same phone:
- Create the project. Tap Start New Project, then Movie, tap the photos and clips you want, then Create Movie (Apple).
- Set each photo’s length. A photo lands on the timeline at 6 to 12 seconds. Tap it and drag the yellow trim handles to shorten it to your 3 to 5 seconds (Apple).
- Control the movement. iMovie adds a slow pan and zoom (the Ken Burns effect) to every photo and uses face detection to keep faces in view. To change it, tap the photo, tap the start button and pinch to frame it, then do the same for the end (Apple).
- Add a title. Tap the first photo, tap the Titles button, pick a style and type your text.
- Add the music. Tap the Add Media button, then Audio: Soundtracks fit themselves to your movie’s length, or add a song from My Music or iCloud Drive. Songs with copy protection (DRM) can’t be used (Apple).
- Save the video. In the Projects browser, tap the project, tap the Share button, then Share Video. Tap Options to pick the resolution, then Save Video (Apple). Sending straight to Mail or Messages from iMovie makes a 360p file, so save it first.
Make a highlight video in Google Photos
Google Photos calls its slideshow a highlight video. On Android (Google):
- Open Google Photos, tap Create at the bottom, then Highlight video.
- Pick a template (templates come with music, text and beat-matching) and tap Use template. Or select your photos first, then tap Create Highlight video.
- Select your photos and clips, or tap Help me select to let Photos choose, then tap Next.
- Tap Edit to change the Aspect ratio, Add Music (with Section to pick the part of the song and Volume for the mix), Add text, or touch and hold a clip to reorder it.
- Tap Save.
On a computer, go to photos.google.com, click Create, then Highlight video and Create your own video, select your photos, click Create, then Save. Edit → Music changes the song, and dragging a clip reorders it (Google). To keep a copy, select the saved video and click More → Download (Google).
Google notes that older devices may not be able to create highlight videos, and its help pages don’t describe setting each photo’s duration. The music Google supplies is for personal, non-commercial use only, so use your own licensed track for anything public.
Make a slideshow with music in Canva
Canva’s current video editor works on a timeline (Canva):
- Start a video. On the home page, select Video (or Create, then Videos).
- Add the photos. Select Add media/blank, then Uploads, and drag your photos onto the timeline in order.
- Set the timing. Drag the edges of each photo on the timeline to change its length. If you don’t see timing controls, you’re in page mode: select the pencil icon on the page thumbnail to switch to the video timeline.
- Add a title. Open the Text tab and select Add a text box.
- Add the music. Select Add Audio on the timeline and choose your uploaded audio or Canva’s music library.
- Add transitions. Hover between two photos and select Add transition, then set its Duration.
- Download. Select Share, Download, choose MP4 Video and select Download (Canva).
On the free plan, Canva downloads MP4s up to 30 minutes long at up to 1920 × 1080. Changing the quality from the default shows an upgrade prompt, so leave it at the default if you aren’t paying. Check the licence of any premium track before posting publicly.
Time every photo in CapCut
CapCut’s desktop app gives you a conventional timeline (CapCut):
- Click Import and add your photos, clips and music.
- Drag them to the timeline in order, then drag each clip’s edges to set its length.
- Open Transitions and drag a transition between two clips where you want one.
- Open Audio to add the music, and Text for the title. Keyframes on a photo’s position and scale give you a pan or slow zoom (CapCut).
- Click Export and choose the format, resolution and frame rate.
Watch for the Pro badge. CapCut’s help center says that if a project uses Pro-marked items, such as templates, effects, music or transitions, or you choose 4K or 60 fps, export asks for a CapCut Pro subscription (CapCut). If export is blocked, swap the badged item for a free one.
Make a slideshow video in ChatCut
ChatCut is a video editor with a built-in AI agent. It runs as a desktop app for macOS 13+ and Windows 10+ and in the browser. It suits a slideshow when you want a real timeline, a mix of photos, clips and music, and the option of handing the first assembly to the agent.
Import and arrange
- Import the media. Open My Assets → Upload and choose Files… or Folder…. Importing a folder creates matching Bins, which keeps a big shoot organized. From phone… shows a QR code so you can send photos straight from your phone (My Assets docs).
- Set the shape. Use Aspect Ratio below the Viewer to pick 16:9 or 9:16 before you arrange anything.
- Arrange the photos. Drag them onto a video track in order, then drag each clip’s edge to set its length. Check portrait photos in the Viewer and move or resize them so faces stay in frame.
Add music, a title and transitions
- Music. Drag the song onto an audio track. If your video clips have their own sound, put them on their own track and set up audio ducking, with that track as the anchor and the music as the follower, so the music dips when someone speaks (Timeline docs).
- Title. Open Templates, preview a title card and select Add to timeline, or ask the agent for one in your own words.
- Transitions. Open Library → Transitions and drag one onto the cut between two photos (Library docs). Use them sparingly, at the section changes.
Ask the agent for the first assembly
For more than a couple of dozen photos, describing the slideshow is faster than dragging every photo. Type @ in the chat box and pick your music file in place of @song:
In ChatCut Desktop the agent can detect the song’s beats and place the changes on them. The result is an ordinary timeline, so you can drag any photo, trim it or swap it out afterwards. The built-in agent uses ChatCut credits for its work even when it only arranges your own media; arranging the timeline by hand doesn’t (Plans and credits).
Export the slideshow
Open Export → Video. In ChatCut Desktop, choose a resolution from 480p to 4K, the frame rate and the range, then pick a folder; the video renders on your computer. Exports from the web editor that render in the cloud go up to 1080p. Exporting doesn’t use credits, though free accounts have a 60-minute cumulative allowance for cloud exports (Export docs).
Open a trip slideshow with an animated map
If the slideshow is a trip, an animated route map makes a strong opening before the photos start. ChatCut’s Paper Atlas Skill builds one: you name the country and the stops, add up to 20 of your own photos, clips or a song, and it produces an editable paper-collage animation, about 30 seconds long and 16:9 unless you ask otherwise. Where your photos don’t cover a landmark, it searches for or generates images, and that generation uses credits. It’s a motion-graphics opener, not a replacement for the slideshow itself.
Fix common slideshow problems
- Faces cut off. The app is filling the frame by cropping the centre of a portrait photo. Move the crop, switch that photo to fit, or start the zoom on the faces.
- The music ends before the pictures, or after. Recount: photos × seconds per photo plus clip time should equal the song. Then trim the song at the end of a phrase and add a 2 to 3 second fade.
- An abrupt ending. Hold the last photo for an extra bar and let the music fade under it. Don’t end on a transition.
- It feels slow. Cut near-duplicate photos before shortening every hold. Ten fewer photos at the same pace usually works better than the same photos rushed.
- It feels busy. Too many transition styles. Use hard cuts on the beat and keep one dissolve for section changes.
- Export blocked or watermarked. A premium element is still in the project: a Pro-badged transition or track in CapCut, or a paid element or non-default quality in Canva’s free plan.
- Photos look soft. Use the original photos, not screenshots or messaging-app copies, and export at the size you will show it: 1080p for most screens, 4K for a large TV if your tool supports it.
Before you share it, watch the exported file from start to finish on the screen it’s meant for: the TV at the party, or a phone for Reels. Check the first and last few seconds, every portrait photo, and that the music is the one you chose. For a vertical version for Instagram, our comparison of Reels editing apps covers the phone-first options.