A Nano Banana prompt works best as a brief to a photographer: what the image is for, what each attached reference controls, what’s in the frame and where, the light, and what must stay exactly as it is, written in full sentences. This guide gives you 15 Nano Banana prompts for the stills a video needs: thumbnails, product stills, storyboard frames, a recurring character and images with readable words. Each card lists the inputs, the prompt, why it’s written that way and what to check before you use the result. Every prompt runs as written in ChatCut’s AI panel, where Nano Banana needs a paid Pro plan and uses credits, starting at 0.39 credits per 1K image.
We wrote these prompts for this guide and haven’t published outputs for them. The one demo video on this page comes from a ChatCut Skill that runs on a different model, and it’s labeled that way. Treat each card as a starting brief and judge the image you actually get.
Key Takeaways
- Write a brief, not a list of tags: purpose, references with one job each, subject, composition, light, and what stays fixed.
- Plan the empty space first. Decide where the headline, the player’s buttons or the title will sit, then describe the pose.
- Keep real photos as your references. For a new framing, rerun the original prompt with a new shot sentence instead of feeding a generated image back in.
- Words and labels are where stills fail most visibly. Quote the exact words, keep them short, and read every letter at full size. Words that must stay editable belong on the timeline, not in the pixels.
How to write Nano Banana prompts
Google’s image-generation guide gives the same core advice for all its Nano Banana models: be specific, explain what the image is for, use camera and lighting language to set the composition, and describe the scene you want instead of listing what to leave out. The Nano Banana Pro prompting guide from Google’s AI developer team frames it as briefing a creative director rather than typing keywords. For stills that go into a video, that advice turns into six parts.
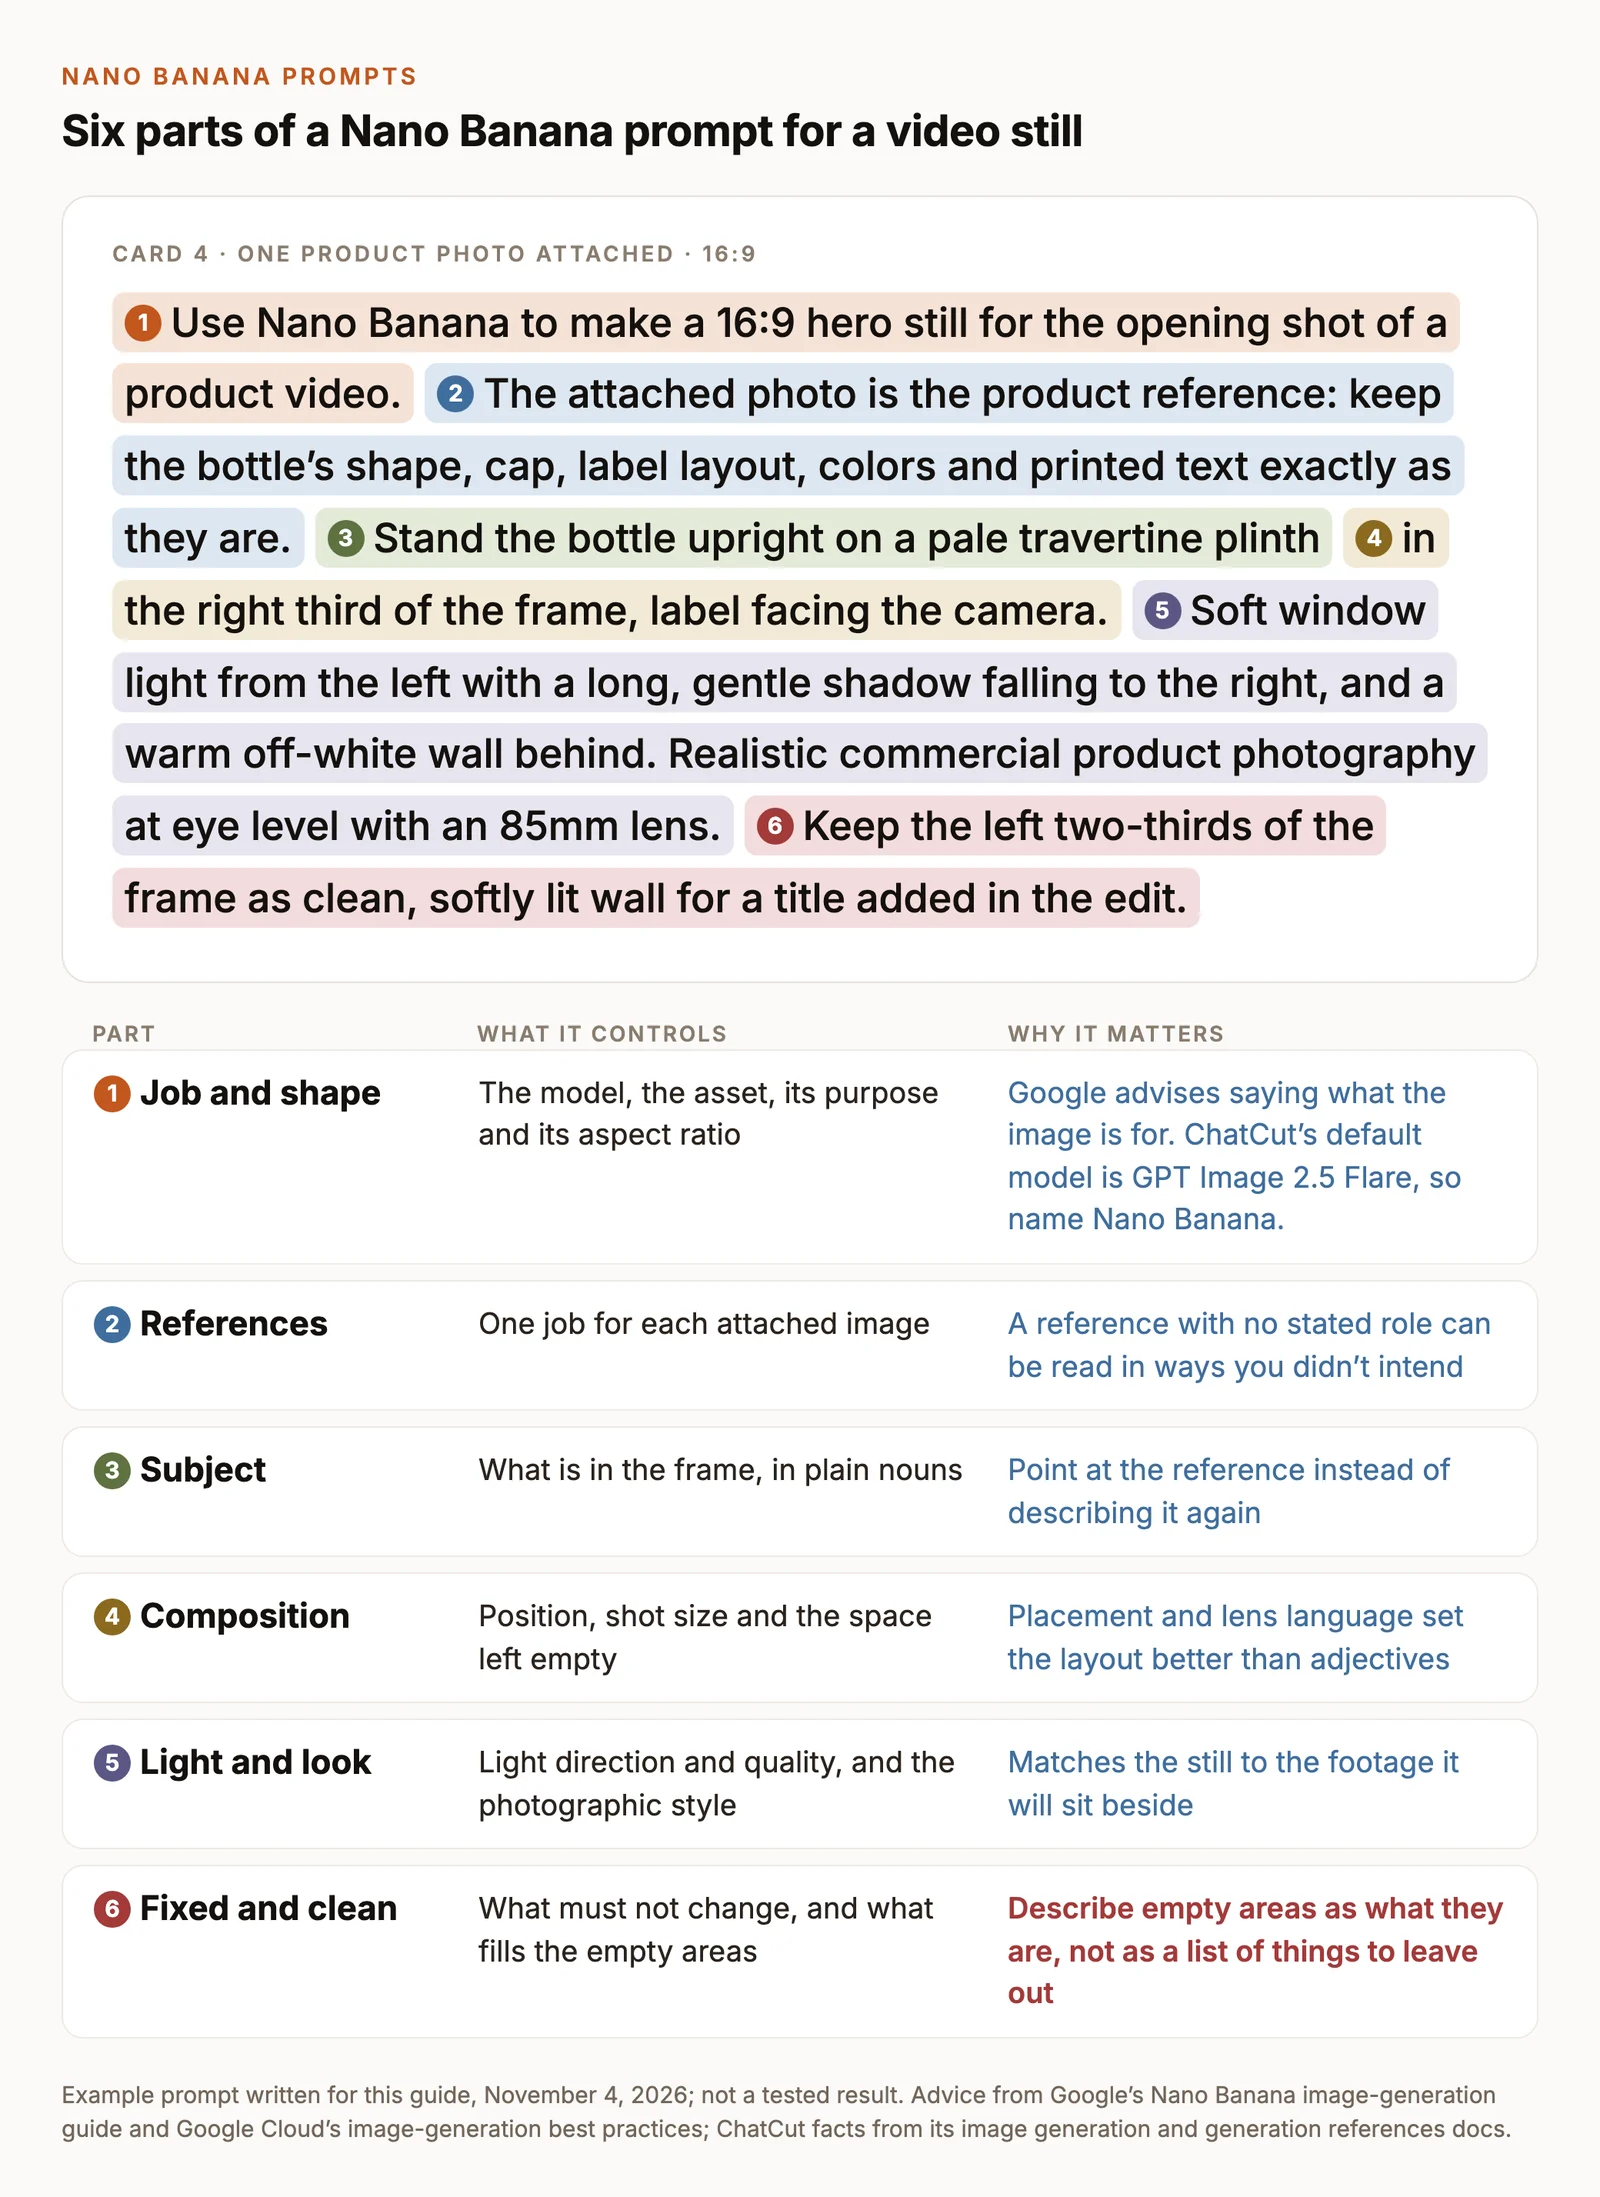
- Job and shape. Start with the model, the asset and its aspect ratio: “Use Nano Banana to make a 16:9 hero still for the opening shot of a product video.” The purpose changes choices you didn’t spell out. A thumbnail needs a face that reads at phone size; an opening shot needs room for a title.
- References. Give every attached image one job: “The attached photo is the product reference: keep its shape, cap and label exactly.” ChatCut’s generation references guide makes the same point: a reference without a stated role can be read in ways you didn’t intend.
- Subject. What’s in the frame, in plain nouns with two or three defining details. When a reference supplies the look, point at it instead of describing it again.
- Composition. Where things sit and what stays empty: “in the right third”, “keep the left two-thirds as plain wall”. Shot size and lens (“eye level, 85mm”) do more than adjectives like “cinematic”.
- Light and look. Direction and quality of light, plus the photographic style: “soft window light from the left”, “candid documentary photography”.
- Fixed details. What must not change, and what fills the areas you want clean. Google recommends describing what should be there (“a plain, unmarked wall”) rather than what shouldn’t. Keep a short exclusion only for the one thing that would ruin the asset, usually stray text.
Two habits from Google Cloud’s image-generation best practices carry over directly. Ask for an image in so many words, so the model doesn’t answer with text. And for complex scenes, write the parts in order: background, then subject, then the detail that matters most.
Set up Nano Banana in ChatCut
- Check your plan. ChatCut’s image models need an active Pro plan and enough credits, per the image generation guide.
- Open the AI panel in Agent mode. Images are generated through the Agent; Video Gen mode is for clips.
- Add your references. Select + to attach files from your computer. To use something already in the project, turn on Selection Mode below the prompt field and select a clip, an asset in My Assets, a point on the Timeline ruler or a box in the Viewer. Each one appears as a chip in the prompt.
- Paste the prompt. Every card starts with “Use Nano Banana” because ChatCut’s default image model is GPT Image 2.5 Flare; without the name, you may get that instead. Ask for more than one image if you want options. ChatCut makes 1 to 10 per request, each as its own job.
- Allow the job. If a confirmation card appears, check the request and the credit estimate, then select Allow.
- Use the result. Follow progress in the conversation or My Assets. Drag the finished image onto a video track, or right-click its card and choose Download.
Nano Banana starts at 0.39 credits per image at 1K, according to ChatCut’s product facts. One credit has a face value of $0.25, so that’s about 10 cents an image. Larger sizes cost more, and each image is a separate charge. Check the estimate on the confirmation card before you allow a job; Credits history shows the final charge.
Google offers several Nano Banana models, including Nano Banana 2 and Nano Banana Pro, and its model list includes newer versions too. ChatCut’s image models include one called Nano Banana. The cards below are plain-language briefs of the kind Google recommends for all of them, so they carry over if you use another version elsewhere. The setup, prices and limits on this page are ChatCut’s.
When to switch models. Two differences are fixed. A transparent background (a PNG cutout) needs GPT Image 2.5; Nano Banana in ChatCut doesn’t offer it. And for cheap drafts, GPT Image 2.5 starts at 0.02 credits per image at low quality. For how the two model families compare on realism, text and layout, see GPT Image 2 vs Nano Banana Pro. The prompts in this guide run on either; only the model name changes.
Plan the asset before the prompt
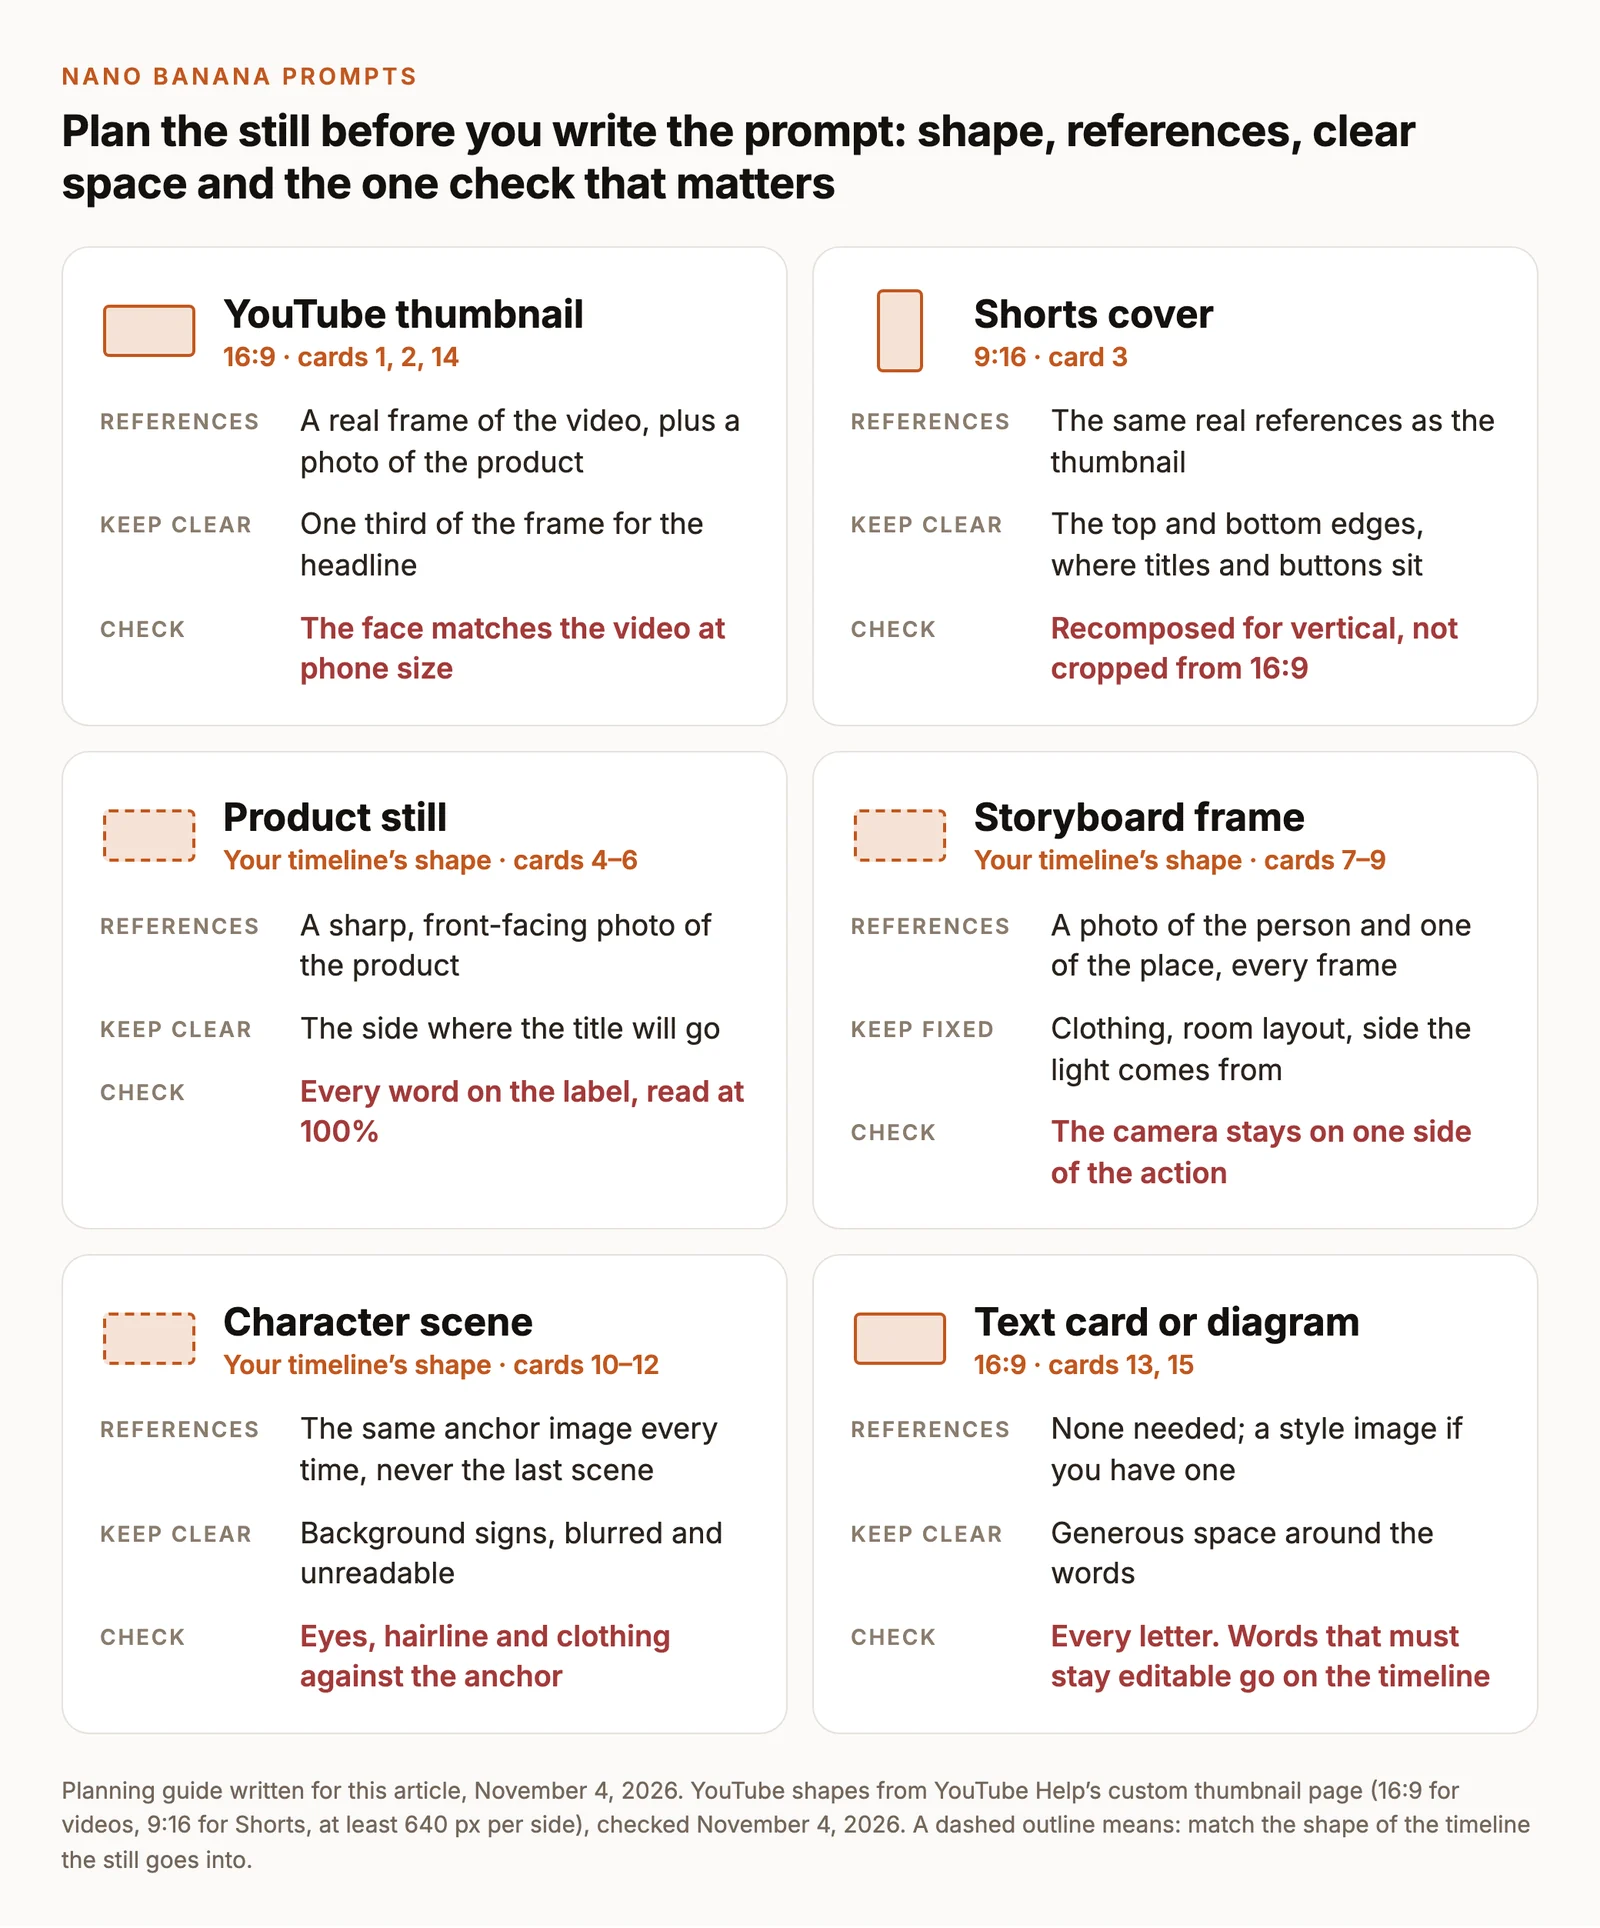
Every still in a video has a shape it must fit, an area that must stay clear and one detail that decides whether it’s usable. Settle those three things first; most of the prompt follows from them.
Thumbnail prompts for YouTube and Shorts
A thumbnail has to work at the size of a phone search result, so it carries one face, one object and a few words at most. YouTube’s thumbnail requirements ask for 16:9 for videos and 9:16 for Shorts, at least 640 pixels on each side. Our YouTube editing guide covers the rest of the upload rules.
Decide the layout before the pose: where the headline goes, then where the face and the product sit. These cards leave the words out of the first version. When the headline is generated together with the face and the product, a misspelled word and a drifted face both cost a full regeneration. Approve the picture first, then add the words with a follow-up edit (see Revise without starting over) or in your design tool.
1. Presenter and product from a real frame
Inputs: a frame of your video where the presenter faces the camera (Selection Mode, then click that point on the Timeline ruler) · a clean photo of the product, attached with + · 16:9
Why it’s written this way: a frame from the video itself keeps the thumbnail honest; viewers notice when the person on the cover isn’t the one in the video. The expression change is kept small, because a new expression is where a face most often stops looking like its reference.
Check: compare the face with the frame at full size, then shrink the image to the width of a phone search result. If the face drifts, drop the expression clause and write “keep their expression from the frame”.
2. Before and after in one frame
Inputs: two photos of the same desk, before and after, taken from the same spot and attached in that order · 16:9
Why it’s written this way: the split is the message, so everything else is held equal. The difference is pushed with light and color, not with new objects, which keeps the promise of the thumbnail true to the video.
Check: nothing on the right side that isn’t in your after photo. If the model tidies further than you did, add “The right half reproduces the second photo; only the light changes.”
3. A vertical cover, recomposed
Inputs: the same frame and product photo as card 1 (not the card 1 result) · 9:16
Why it’s written this way: a vertical cover is a new composition, not a crop of the wide one. Cropping a 16:9 image to 9:16 throws away about two-thirds of it, often including the product. Reusing the real references and the same light sentence keeps the pair consistent without passing a generated image back through the model.
Check: set the two covers side by side. Same person, same product, same palette; the face and product clear of the top and bottom edges.
Product still prompts
A product video needs a handful of stills that cut together: a hero for the opening, a close-up of the detail buyers check, and the product in use. Cards 4 to 6 use one product, a glass bottle of cold brew coffee, so you can see how the sentences repeat. Start from a sharp, front-facing photo of your product on a plain background with the label in focus. The model can only keep what it can see.
4. Hero still with room for a title
Inputs: a sharp front photo of the product, attached with + · 16:9, or 9:16 for a vertical edit
Why it’s written this way: the purpose (“opening shot of a product video”) and the reserved space work together. The empty two-thirds is described as what it is, a softly lit wall, so the model has something to draw there besides props.
Check: the shape, cap and label against your product photo. If the bottle comes out too small or too large on the plinth, give a height: “about 20 cm tall”.
5. Label close-up for an insert shot
Inputs: the same product photo as card 4 · 16:9
Why it’s written this way: the set and light sentences are copied from card 4, so the close-up cuts against the hero. The reference is your real photo, not the generated hero, so the label is copied from the product rather than from a copy of it.
Check: zoom to 100% and read every word against the real bottle. If one letter changes, don’t use the image: a close-up shows a wrong label to every viewer. Retake the reference sharper and straight on, or film the real label for this shot.
6. The product in use, for B-roll
Inputs: the same product photo · 16:9
Why it’s written this way: B-roll sits next to filmed footage, so the style asks for candid photography rather than a studio look. The size is given in centimeters because scale is the detail composites most often get wrong.
Check: the hand (count the fingers), the pour and the label direction. If the hand looks wrong, give it a simpler job, such as holding the bottle upright by its neck instead of pouring.
If you’d rather pick a ready-made scene than write the brief, ChatCut’s Product Photos Skills do this job from one product photo: studio sets, real places, in-hand shots, flat lays and more. They run on GPT Image 2.5 rather than Nano Banana, and you choose the scene from examples instead of describing it.
Storyboard frame prompts
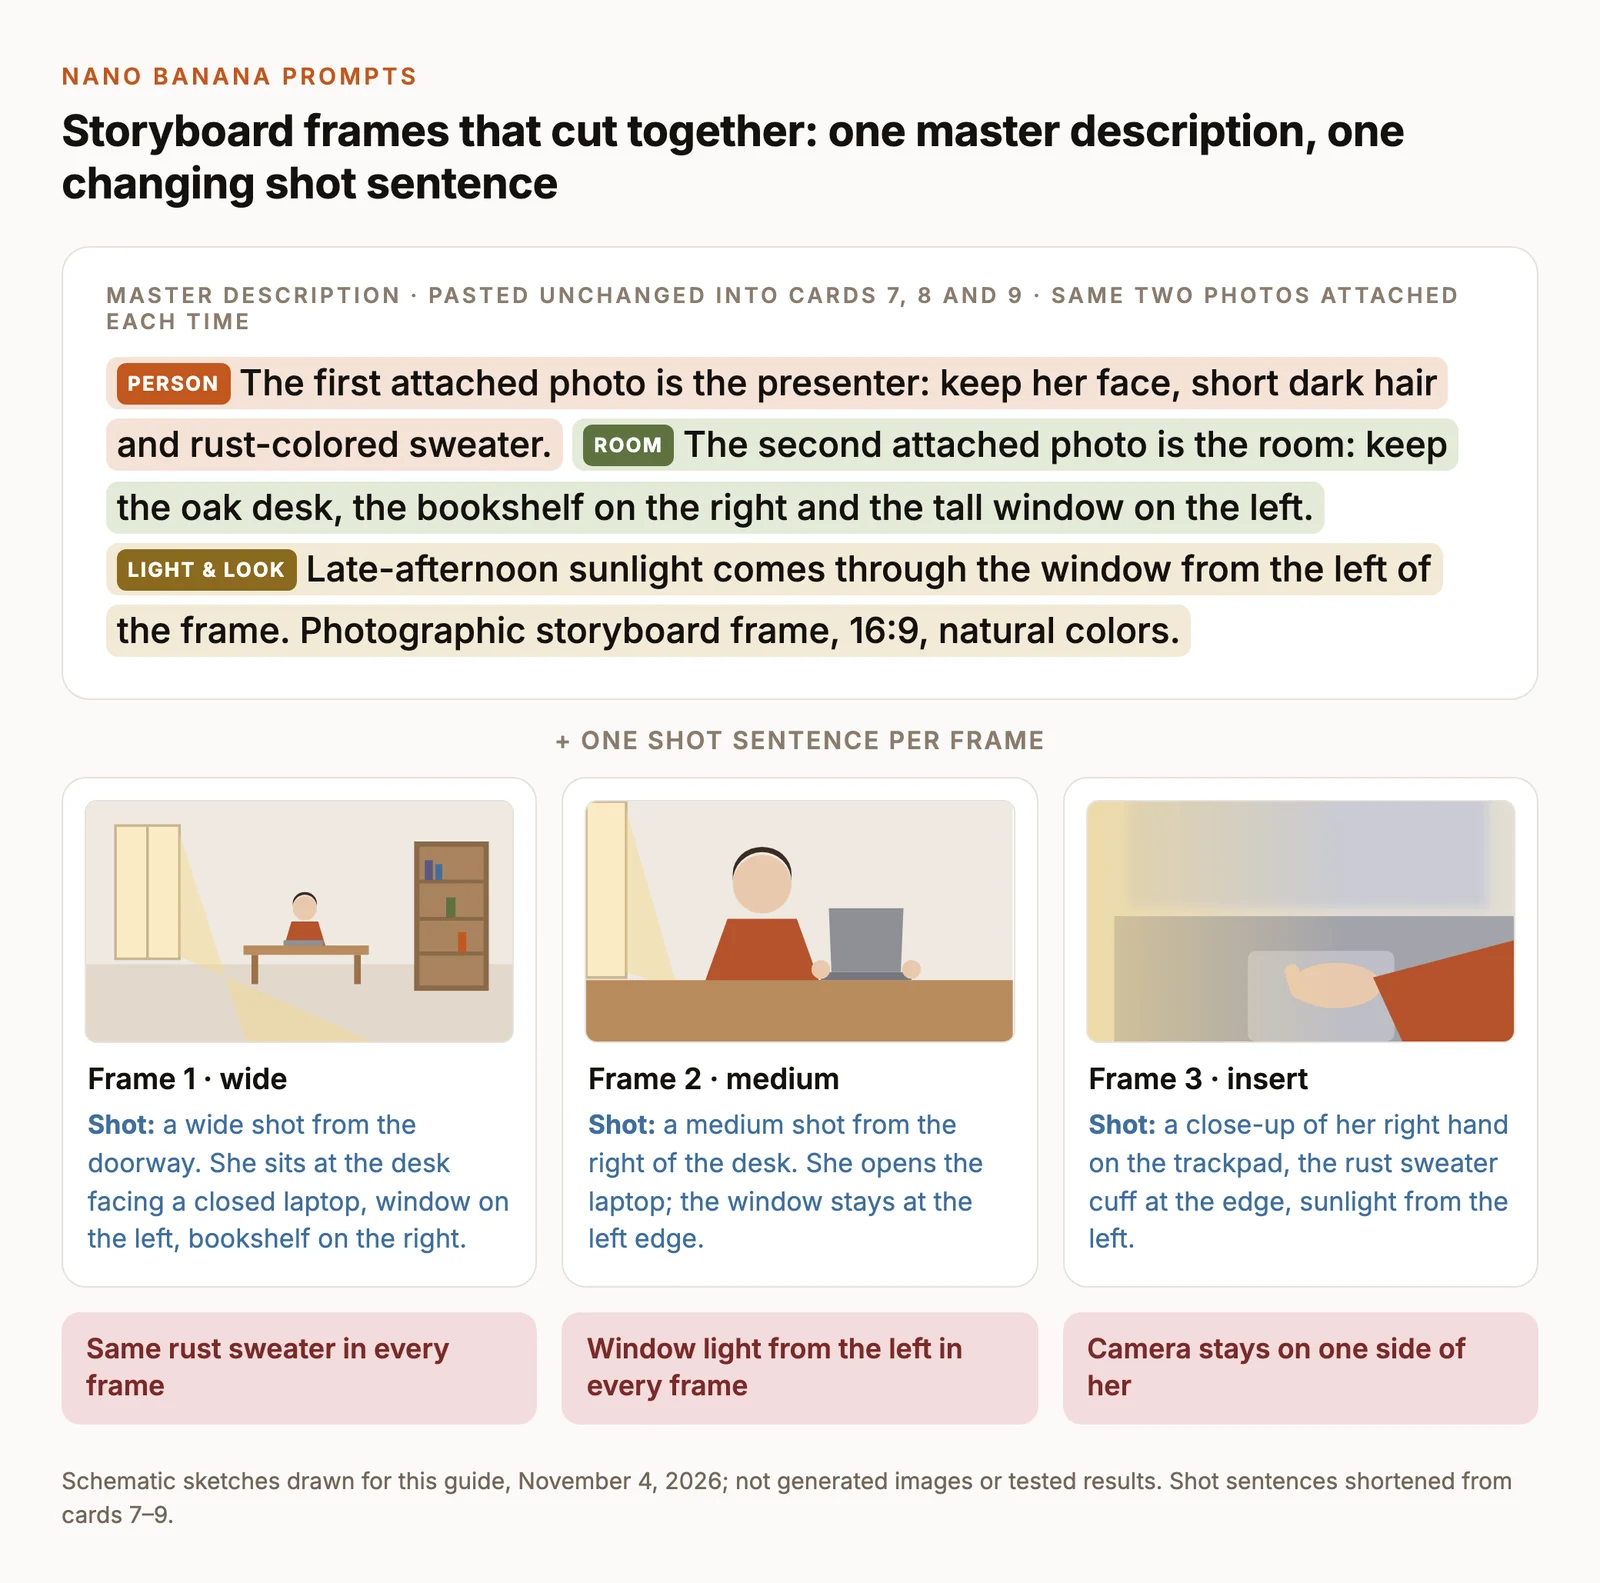
Storyboard frames let you test a sequence before you shoot or generate it, and a good frame can become the first frame of a generated clip. What makes three frames read as one scene is continuity: the same person in the same clothes, the same room, light from the same side, and the camera staying on one side of the action.
The way to get that is a master description you paste into every frame’s prompt word for word. Only the shot sentence changes. Generate one frame per request, so a bad frame can be redone without touching the others, and attach the same two real photos every time rather than the previous frame.
7. Wide establishing frame
Inputs: a photo of the presenter, who has agreed to it · a photo of the room · both attached with +, in that order · 16:9
Why it’s written this way: the first four sentences are the master description. The wide frame establishes the geography every later frame must respect: window left, shelf right, desk in between.
Check: the room matches your photo closely enough that a viewer would accept it as the same place.
8. Medium action frame
Inputs: the same two photos, in the same order · 16:9
Why it’s written this way: one action, and a sentence that pins the window to the left. If the light or the window jumps sides between frames, the cut reads as a different room or a different time of day.
Check: sweater color, hair and the light direction against frame 1.
9. Detail insert
Inputs: the same two photos, in the same order · 16:9
Why it’s written this way: an insert shows almost nothing of the person, so continuity rides on two details: the sleeve color and the light direction. Both are named.
Check: the cuff color matches frames 1 and 2, and the hand is plausible at full size.
Drop the three frames onto the timeline at two or three seconds each and play them: you’ll see straight away whether the sequence reads. To fill a gap in an existing edit, select that point on the Timeline ruler with Selection Mode and add “for the gap at the selected time, matching the shape of the surrounding clips” to the prompt. When a frame is approved, it can become the First Frame of a generated clip; our image-to-video prompts cover what to write for the motion.
Character consistency prompts
A recurring character, such as a channel host, a mascot or a person in a short story, has to be recognizable from scene to scene. Google documents up to 14 reference images for Nano Banana Pro, but more references aren’t the fix. One clean anchor image, attached every time, does more than a pile of scenes.
If the character is a real person, start from real photos of them, taken with their agreement, and attach those every time. If the character is invented, card 10 makes the anchor. In both cases, never use the latest scene as the reference for the next one. Each pass redraws the whole image, so a small drift in scene 3 becomes the starting point for scene 4.
10. Create the anchor image
Inputs: text only · 16:9
Why it’s written this way: three angles in one image give later prompts more of the character to work from, and the plain background keeps the reference about the person. Save this exact description; you’ll paste it into every scene.
Check: all three figures are the same person with the same clothing details. Regenerate until they are; everything after this inherits the anchor’s flaws.
11. Same character, new setting
Inputs: the approved anchor image (Selection Mode, then select it in My Assets) · 16:9
Why it’s written this way: the last sentence draws the line between what’s allowed to change and what isn’t. The blurred signs are written as what they look like, which keeps invented lettering out of the background.
Check: eyes, nose, hairline and freckles against the anchor, then the raincoat’s color and collar.
12. Same character, close-up reaction
Inputs: the same anchor image · 16:9
Why it’s written this way: a close-up magnifies every difference in the face, so the expression is a small one. Big expressions, such as a wide-open mouth or raised eyebrows, change the shape of the face the model is trying to keep.
Check: put the close-up next to the anchor at the same size. If she looks like a relative rather than the same person, shorten the list of changes and generate again from the anchor.
Prompts for text in images
Nano Banana can render short, legible text, and Google’s guide recommends deciding the exact words before you ask for the image. Three rules make it dependable: put the exact words in quotes, keep them to a few words, and say what the letters look like and where they sit. Then read every letter at full size. Words that must stay editable, be translated or animate belong on the timeline instead, as a Motion Graphics title or callout.
13. Chapter title card
Inputs: text only · 16:9
Why it’s written this way: four words, one typeface described by its look, and high contrast. A sparse card leaves the model nothing else to get wrong.
Check: spelling, letter by letter. If it keeps breaking, generate the background and the saucepan without the words, then add the title as a Motion Graphic on top.
14. Headline behind the subject
Inputs: a photo of the presenter, attached with + · 16:9
Why it’s written this way: text layered behind a person is a common thumbnail style that’s tedious to cut out by hand. The prompt states how much of the word she may cover, because a headline hidden behind a head stops being a headline.
Check: the word reads in under a second at phone size, and her face matches the photo.
15. Labeled diagram for an explainer
Inputs: text only · 16:9
Why it’s written this way: a flat illustration on white keeps the labels the clearest thing in the frame. Four labels is a manageable number to check.
Check: each label points to the right part, and every word is spelled correctly. If a label lands on the wrong part, generate the drawing without labels and add them as Motion Graphics callouts, where you can also animate them in one at a time.
Revise without starting over
When an image is mostly right, ask for the specific change instead of generating a new one; Google’s prompting guide makes the same recommendation. In ChatCut, select the result in My Assets with Selection Mode so it’s attached, say what changes, and say what stays.
This is also the safer way to add a headline to an approved thumbnail, since the face and product are already settled:
Each edit creates a new asset; the original stays in My Assets. Small edits like these are fine. For a new framing, a new angle or a new scene, go back to the original prompt and the real references and change the shot sentence, as in cards 7 to 9. Editing a generated image into a different shot asks the model to invent the parts it can’t see, starting from parts it already invented.
When a Nano Banana image misses
Generating the same prompt again mostly gets you another version of the same problem. Find the instruction that controls it and change only that.
- The face changes. Fewer changes in one prompt and a smaller expression. Attach the real photo or the anchor again, never the last scene.
- The label or logo is wrong. Use a sharper, straight-on product photo, keep the label facing the camera, and avoid close-ups until the wide shot is right. If it still changes, use a real photo for that shot.
- Stray text appears on signs and screens. Describe those surfaces as what they look like: “blurred and unreadable”, “plain”, “a blank screen”. Then add one sentence saying the image contains no other words.
- The empty space gets filled. Name the region and what’s in it: “the left two-thirds is plain, softly lit wall.”
- The product is the wrong size. Give a real measurement and something to compare it with, such as a hand or a glass.
- The vertical version loses the subject. Recompose for 9:16 in the prompt instead of cropping the 16:9 image.
- It looks too smooth or artificial. Ask for a lens, a type of photography and “natural skin texture”. Replace tag strings like “8k, hyper-detailed” with a sentence describing the photograph.
- The request is refused. Read the message. Use photos of real people only with their permission, and expect some subjects to be blocked by the model provider.
Put the stills to work in your edit
A generated image is a project asset like any other. Drag it from My Assets to a video track, then set its position, scale, crop and duration in the Inspector. If the image already exists on your computer, import it with My Assets → Import → Files… rather than generating it again.
From there, four things are common:
- Titles on top. Put headlines and lower thirds over a still as Motion Graphics, so the words stay editable.
- A cutout. Nano Banana doesn’t output transparent PNGs in ChatCut. On ChatCut Desktop, AI Smart Cutout can select an object in an image so you can place it over other footage.
- Motion. Use an approved still as the First Frame in Video Gen to turn it into a clip.
- A full product video. Product images are what ChatCut’s product-ad Skills start from. The demo below shows the kind of sequence a beverage ad builds: macro fruit, falling slices, a label close-up and a bottle hero.
The Citrus Storm Skill turns product images, flavor details and brand information into a beverage commercial like this one. The label close-up in its sequence is the shot to check most carefully, for the same reason as card 5.